The Internet of Things (IoT) has moved far beyond buzzword territory. From smart thermostats and wearables to industrial sensors and connected cars, IoT devices are becoming part of our everyday digital fabric. In Apple's ecosystem, this evolution is even more profound thanks to its tight integration between hardware and software, robust security model, and developer-friendly APIs.
But with high diversity comes high implementation complexity. As developers, we're not just building apps anymore, we're orchestrating experiences across a dynamic web of devices, data streams, and real-time interactions. Managing this chaos on iOS, especially with high user expectations and tight budgets, requires more than just good code. It requires a strategy.
The challenge of scalability and maintainability in IoT ecosystems
An IoT app might start simple: connect to a sensor, show some data, maybe trigger an action. But give it a handful of new features and an increasing number of capabilities from your devices, and suddenly you're tangled in edge cases, juggling disconnected devices, flaky Bluetooth sessions, and business logic buried deep within your components.
Scalability isn't just about handling more users or devices, it's about being able to adapt, extend, and maintain your app without losing your sanity (or your users). This means choosing the right architecture, understanding how different APIs behave in real-world conditions, and designing your app to scale with both complexity and usage.
What You’ll Learn in This Article
This article aims to be your survival guide for building scalable IoT apps on iOS. Whether you're starting fresh or scaling an existing project, we'll walk through:
● iOS APIs and Device Interactions: In this section, we’ll take a high-level look at the most important iOS APIs for building IoT experiences.
● CoreBluetooth deep-dive into implementation: Covering best practices, pitfalls to avoid, and how to handle real-world quirks like flaky connections, state restoration, and background limitations.
● Design Patterns Over Architecture: Choosing MVVM isn’t a silver bullet, crafting an architecture that actually serves your app’s complexity is what really delivers maintainability and clarity.
If you’re tired of wrestling with unwieldy view controllers, device timeouts, and tangled code that breaks every time you add a new sensor, this guide is for you. Let’s dive into the chaos and learn how to survive it.
iOS APIs and Device Interactions
Apple's ecosystem offers a rich set of frameworks for building apps that interact with hardware, peripherals, and connected devices. Whether you're creating an IoT onboarding experience, syncing data over Bluetooth, or enabling smart home automation, choosing the right API is key. Below is an overview of core iOS APIs for device communication and interaction, each with their strengths, limitations, and ideal use cases.
CoreBluetooth – Bluetooth Low Energy (BLE) Communication
Strengths
● Low-power, short-range data exchange.
● Rich API for scanning, connecting, discovering services, and reading/writing characteristics.
Limitations
● Requires proximity.
● No built-in UI or high-level device abstraction.
Ideal Use Cases
● Communicating with BLE enabled peripherals like sensors, wearables, fitness devices, or custom IoT hardware.
CoreLocation (iBeacons)
Strengths
● Detects physical proximity to iBeacons.
● Works in background with region monitoring.
● Provides proximity estimates (immediate, near, far).
Limitations
● Requires physical iBeacons or devices configured as iBeacons.
● Needs user location permissions.
● Not suitable for high-accuracy indoor positioning.
Ideal Use Cases
● Presence-based automation (e.g., room entry/exit).
● Location-aware content in retail, smart homes, or enterprise apps.
● Personalized app behavior based on proximity.
CoreNFC – Near Field Communication (NFC) for IoT Devices
Strengths
● Simple tap-based interactions.
● Good for quick provisioning or identification.
Limitations
● Only works on supported iPhones and specific tag types.
● Requires explicit user permission and NFC session.
Ideal Use Cases
● Tap-to-pair, tap-to-identify scenarios.
● Provisioning IoT devices (e.g., send Wi-Fi credentials).
● Secure, physical presence interactions.
HomeKit – Apple’s Smart Home Framework
Strengths
● Deep integration with the Apple ecosystem (Siri, iOS, Apple TV).
● Secure control and automation of smart devices.
● Organizes devices by rooms, scenes, triggers.
Limitations
● Only for HomeKit-compatible accessories.
● Can be restrictive for developers not in the Apple ecosystem.
Ideal Use Cases
● Building smart home control apps.
● Creating automations, voice control via Siri.
● Managing home devices like thermostats, lights, or cameras.
NetworkExtension – VPN & Wi-Fi Management for Secure IoT Networking
Strengths
● Enables secure networking for IoT devices.
● Supports VPNs, DNS proxies, Wi-Fi onboarding.
Limitations
● Requires specific Apple entitlements.
● Complex setup for advanced features like packet tunneling.
Ideal Use Cases
● Onboarding devices to Wi-Fi networks (e.g., ESP32-style flows).
● Building custom VPNs for secure IoT traffic.
● Industrial or enterprise IoT apps needing secure communication.
MultipeerConnectivity – Peer-to-Peer Networking Without Internet
Strengths
● Direct communication between Apple devices over Wi-Fi/Bluetooth.
● No internet required.
Limitations
● Only works between Apple devices.
● Not compatible with third-party IoT hardware.
Ideal Use Cases
● Local collaboration tools.
● Offline device syncing or file sharing.
● Games or mesh-like local interactions.
In this article, we’ll focus specifically on CoreBluetooth, exploring how to use it for interacting with BLE enabled devices. The other frameworks, including CoreNFC, HomeKit, NetworkExtension, and iBeacon support via CoreLocation will be covered in future articles, each diving into their unique capabilities and use cases.
CoreBluetooth in depth example for scalable code design
Before we start digging deeper into CoreBluetooth, you should know that this isn’t a perfect or universal solution, and it’s not meant to be. What we’re sharing here is simply one approach in which we attempt a scalable design for our applications. You shouldn’t treat it as a blueprint to follow exactly, but rather as a starting point for designing something that fits your own needs. Every product, codebase, and team is different, and the best architecture is the one that’s thoughtfully tailored to your goals, not blindly copied. Use this as inspiration, adapt what resonates, and don’t be afraid to shape your own custom solution as your project evolves.
Risks in a Naive CoreBluetooth Implementation
If you pile all logic (discovery, connection, data exchange) into a single delegate-heavy service class, you risk:
● Massive BluetoothService classes that are hard to test.
● Tight coupling between low-level APIs and business logic.
● Scaling becomes challenging when supporting multiple device types.
● Error-prone state handling and retry logic mixed with UI concerns.
Configurable objects! A better strategy
One of the major advantages of using a clean, concern separating architecture like this is its flexibility to scale across multiple device types, without rewriting core logic for each one. In this approach, we inject configuration objects into our Bluetooth stack. These configurations define device-specific behaviors such as scanning criteria, connection rules, and characteristic parsing, allowing each module (Discovery, Connection, Communication) to adapt dynamically based on the device being handled.
Key Benefits of This Strategy:
● Reusability: A single, shared Bluetooth stack handles all devices, reducing duplicated code.
● Cleaner Codebase: Device-specific details are abstracted out of core logic, resulting in better separation and modularity.
● Scalability: Adding support for a new device is as simple as defining a new configuration, rather than duplicating or subclassing managers.
● Testability: Each configuration can be easily mocked, making unit testing predictable and isolated.
An example of a Bluetooth Manager implementation designed with a clear separation of concerns, tailored for real-world device interaction use cases:
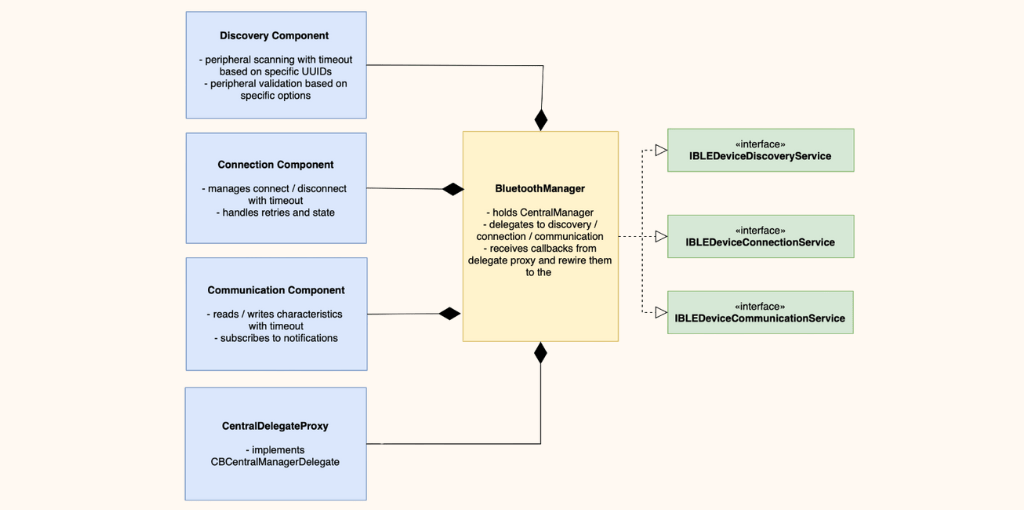
Before diving into the components themselves, let’s address a foundational architectural choice, why use a CentralDelegateProxy at all?
In most CoreBluetooth implementations, it’s typical to see the main Bluetooth manager class conform directly to CBCentralManagerDelegate. While this might suffice for smaller apps, it quickly becomes a limiting design as your app grows in complexity.
By introducing a dedicated delegate proxy, we unlock several important benefits:
● Testability: It becomes significantly easier to mock and simulate Bluetooth events. You can now test how your Bluetooth manager responds to various scenarios—disconnections, peripheral discoveries, reconnection strategies—without relying on physical devices or the actual CoreBluetooth stack.
● Separation of Concerns: Your BluetoothDeviceManager is now focused purely on orchestration. It no longer needs to deal directly with low-level system callbacks, which keeps it cleaner and more maintainable.
● Decoupling from Apple APIs: With the delegate methods abstracted away, your core logic becomes less tightly bound to Apple's implementation details. This opens the door to easier refactoring or integrating modern paradigms like async/await, Combine, or even cross-platform abstractions down the line.
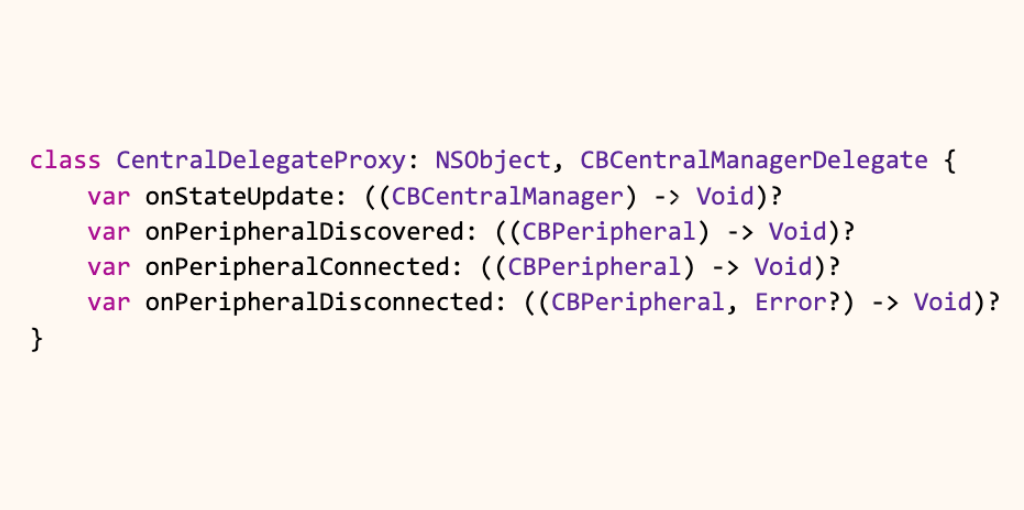
Our delegate proxy object conforms to CBCentralManagerDelegate, serving as an isolated layer that handles all system-level Bluetooth events. This design allows us to forward those events to the BluetoothDeviceManager using any mechanism we choose, without tying the manager itself to Apple’s delegate patterns.
In this example, we’re using a closure-based approach for simplicity and flexibility. However, the proxy could just as easily communicate via Swift Concurrency, Combine publishers, or even a custom protocol, whatever best fits your architecture. This makes the proxy a clean, maintainable boundary between CoreBluetooth and your application logic.
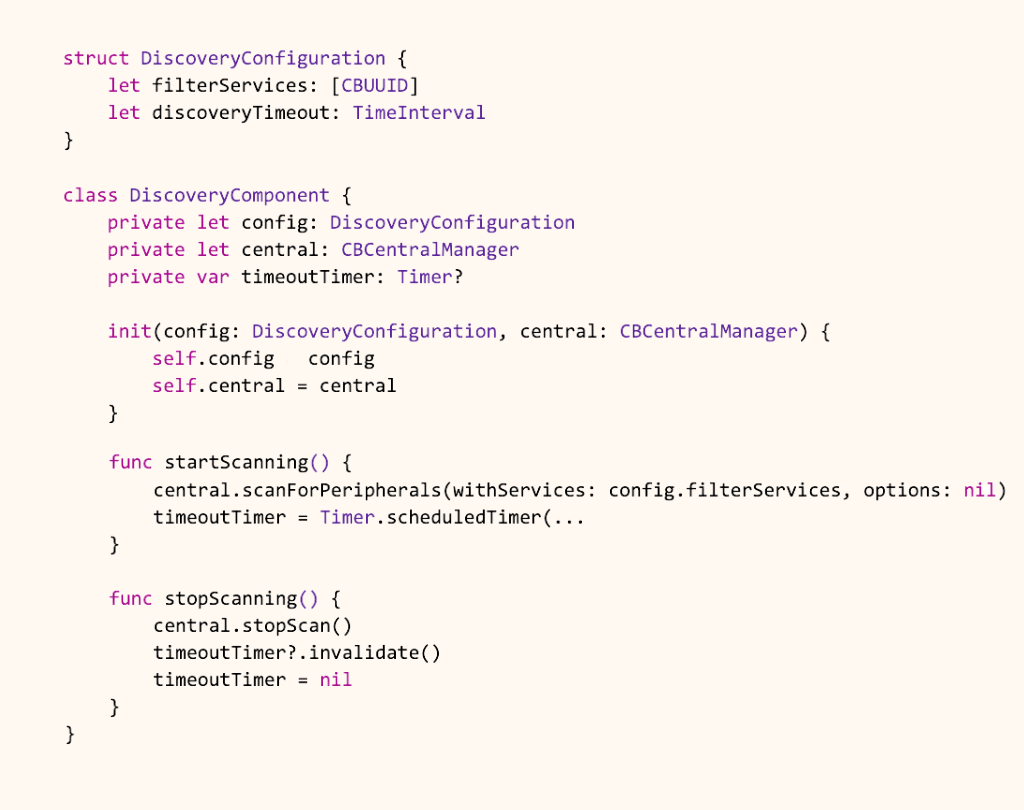
Now let's start breaking down our other components that are part of our BluetoothManager. First we start with the discovery component. It is responsible for managing the Bluetooth peripheral scanning process. It acts as the first stage in the Bluetooth workflow, focusing purely on discovering nearby devices that advertise specific services defined in its configuration.
Discovery Component
Its key responsibilities include:
● Starting and stopping scans using CBCentralManager.
● Filtering peripherals based on service UUIDs provided via a DiscoveryConfiguration.
● Timing out scans after a specified duration to avoid unnecessary battery usage or blocking behavior.
● Exposing discovered peripherals through a clean callback (onDiscovered), allowing the rest of the system to react accordingly.
At this point our BluetoothManager has a proxy object for delegate callbacks from the central manager and a discovery component that can be configured with our specific device information. First let's start defining our interface.
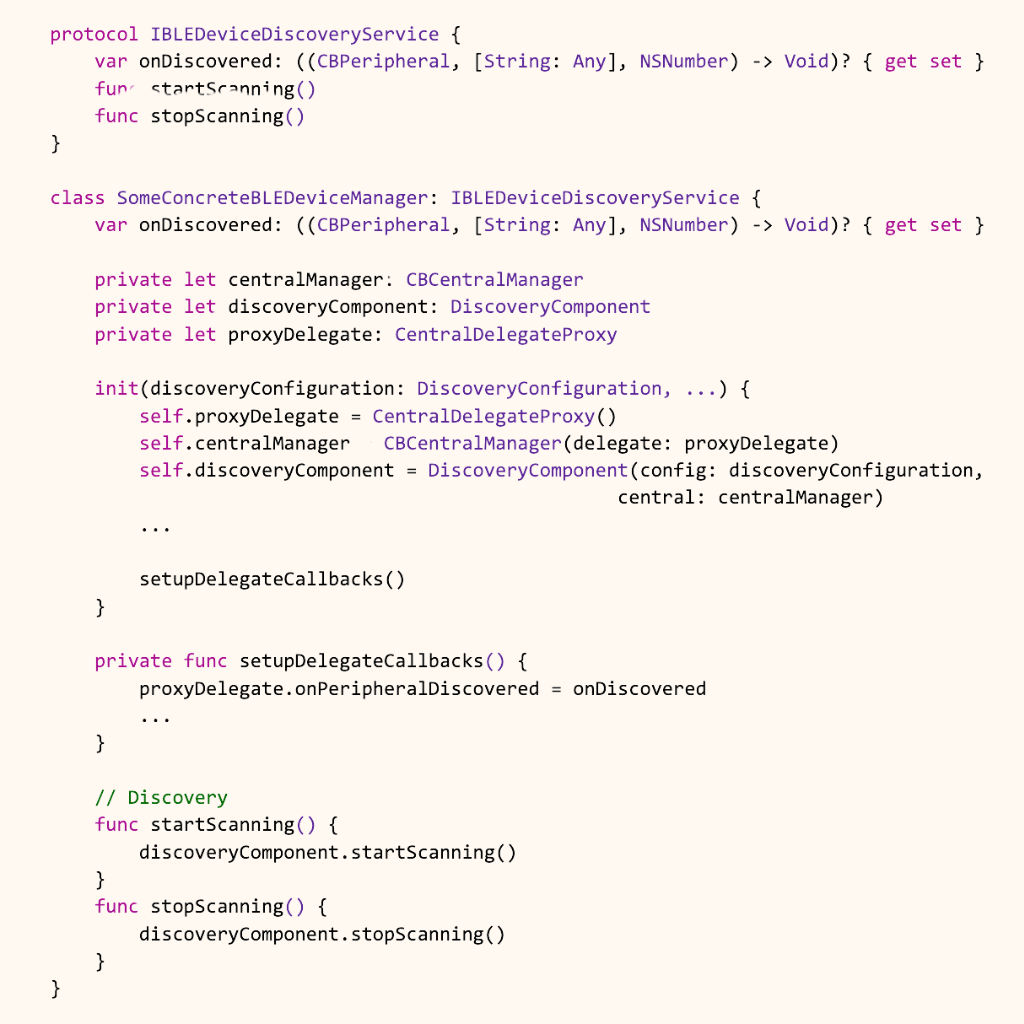
Now, let’s take a step back and reflect on what this architecture has actually achieved. At first glance, it might seem like we’ve added a lot of moving parts, interfaces, components, delegate proxies, and someone might argue it’s too complex for something as “simple” as Bluetooth discovery, but there’s more to it.
What we’ve built is a BluetoothDeviceManager that’s completely decoupled from Apple’s native protocols, on which we can easily build our next features. Our discovery logic is fully configurable and reusable across any type of Bluetooth device. Better yet, the discovered peripherals can be exposed through any interface we choose, closures, delegates, Combine, async/await, because the system is designed with flexibility in mind.
Where this approach truly shines is in testing. By injecting a mocked delegate proxy, we can simulate any sequence of Bluetooth events and verify how the system responds, all without needing a real device or an active Bluetooth session, but let’s explore this advantage as we go further into our connection handling component.
Connection Component
The ConnectionComponent is responsible for handling the Bluetooth connection lifecycle with discovered peripherals. Once a peripheral is identified during the discovery phase, this component takes over to manage the process of establishing and maintaining a connection.
Its core responsibilities include:
● Initiating connections to a specified CBPeripheral using CBCentralManager.
● Applying timeout logic, based on the ConnectionConfiguration, to gracefully handle peripherals that don’t respond within a reasonable timeframe.
● Managing disconnections by explicitly canceling connections or handling unexpected disconnects from the system.
● Exposing connection state changes (success, failure, disconnection) through callbacks (onConnected, onDisconnected), allowing higher-level systems to react appropriately—e.g., by setting up communication or retrying.
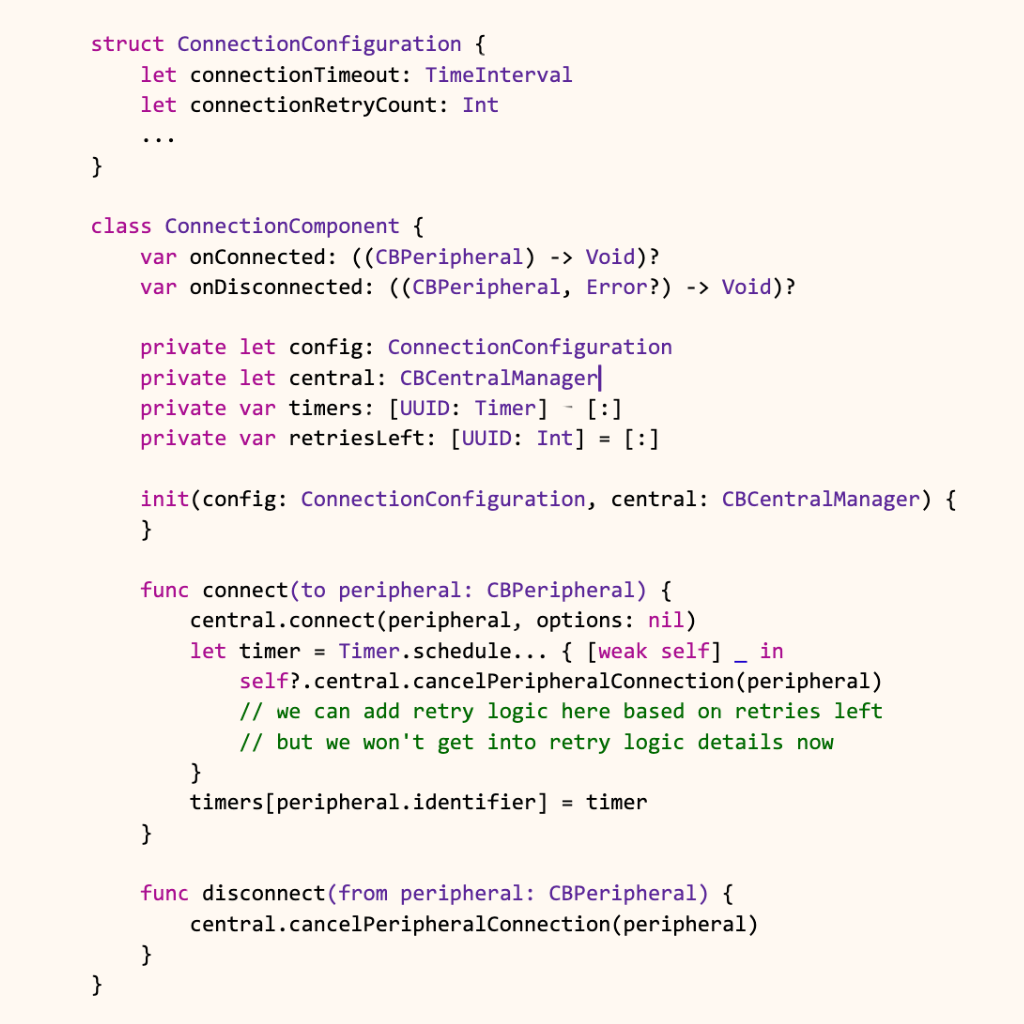
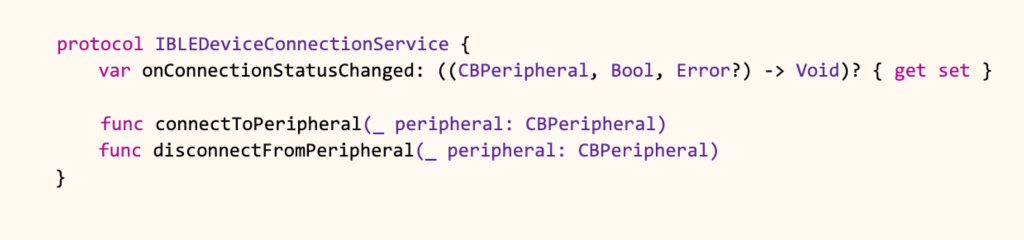
Now we can start adding our new feature to the existing bluetooth manager so we can establish a connection between our application and the devices we discovered at the previous step. First step, let’s define our interface for connection handling, and conform our manager to the new interface.
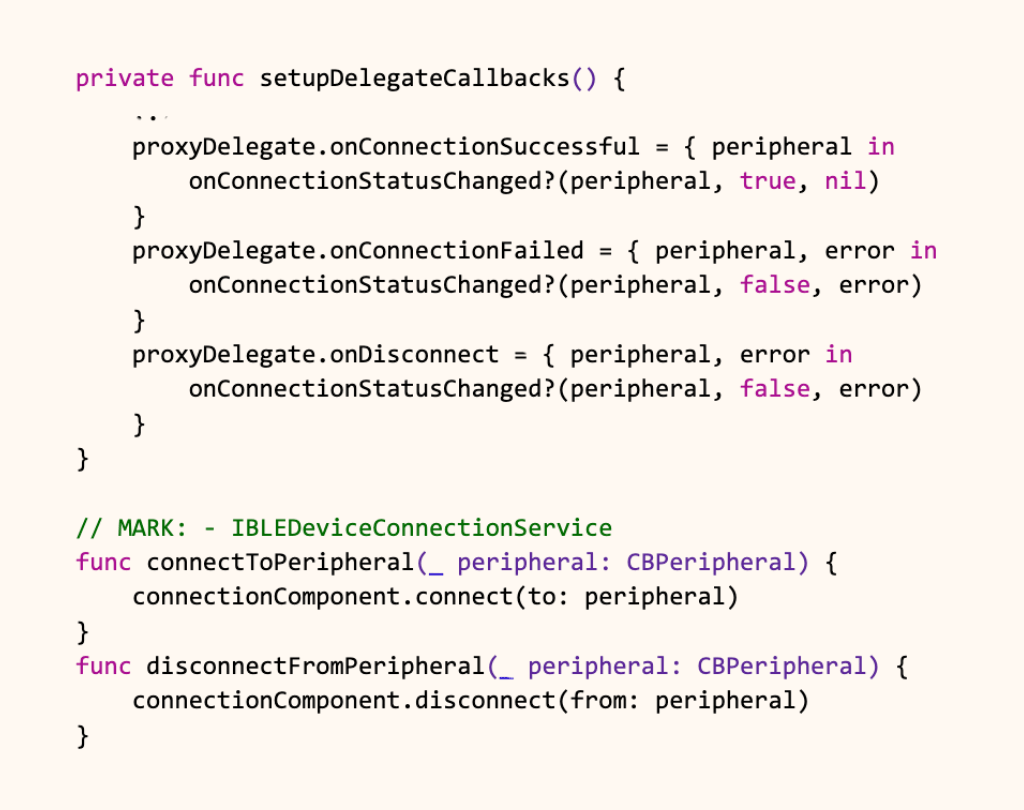
Next, we inject our new configuration object, instantiate the required connection component, similar to the discovery one, and hook up the necessary callbacks from our delegate proxy.
So now we have a fully functional discovery service, which we can inject in the parts of our application where we need maybe a display only capability, and a functional connection service which we can use to connect or disconnect from our devices.
As you can guess, what's left is our communication component which we will design in a similar way. We start with the interface for our manager, we define our configuration object for the connection component and we hook up the necessary callbacks from our proxy. The main difference now is that our communication component will implement the CBPeripheralDelegate protocol. Let’s start with the new interface for interacting with the device through our BLEDeviceManager.
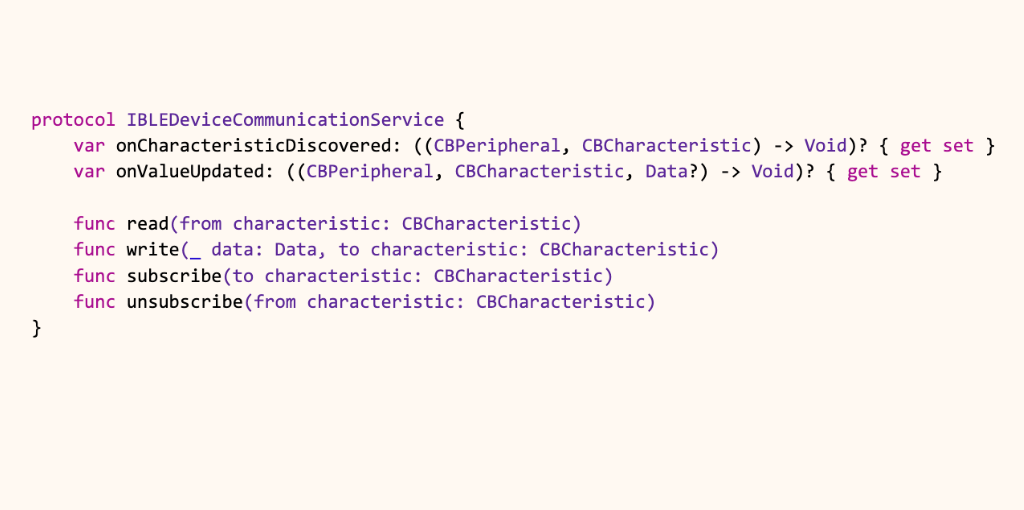
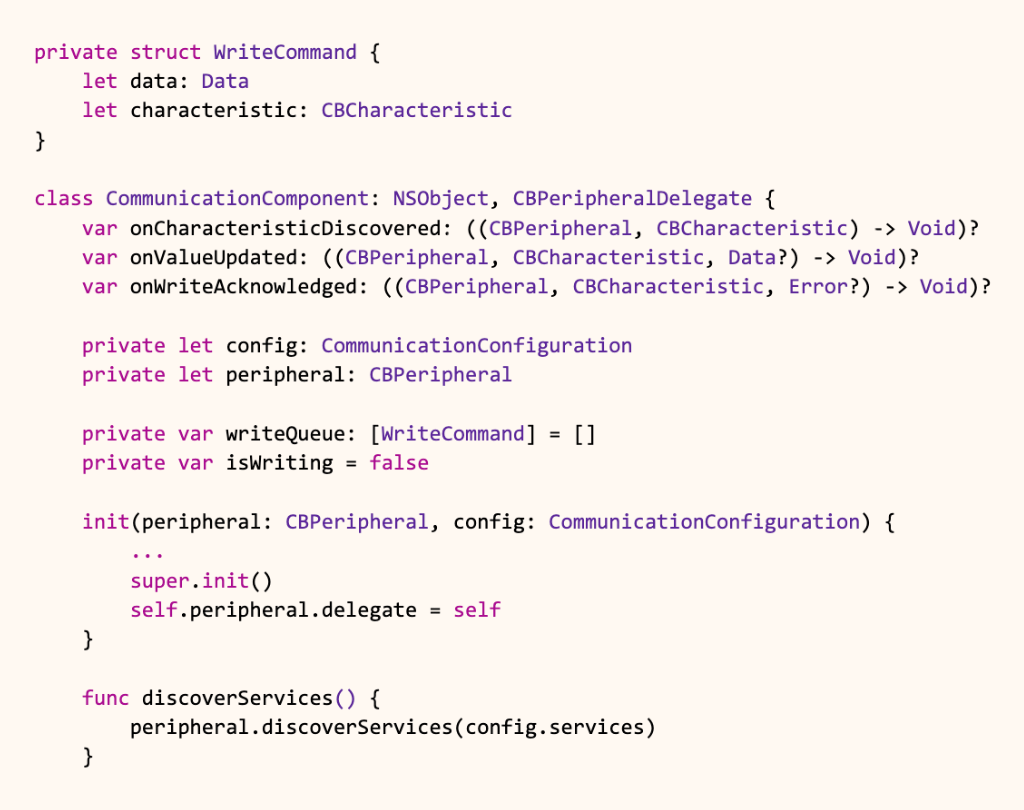
Communication Component
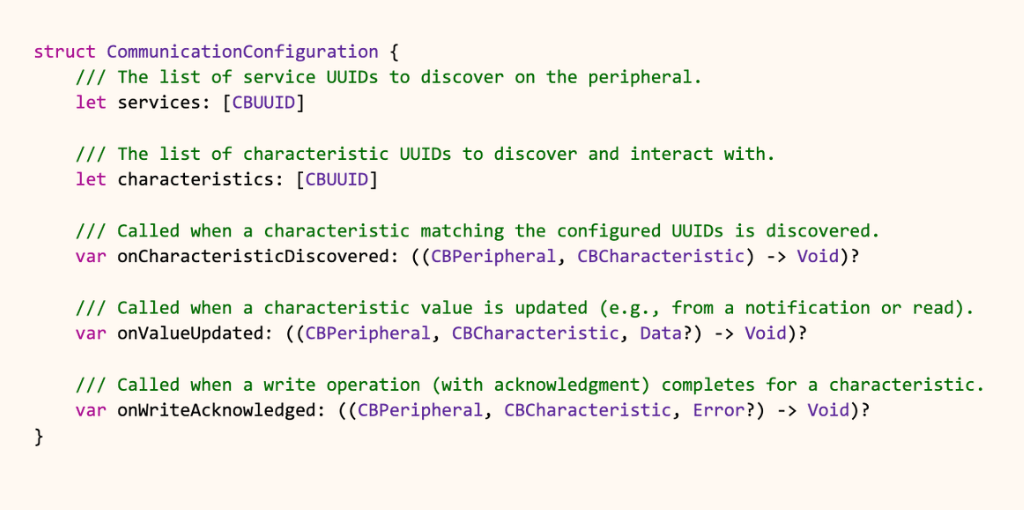
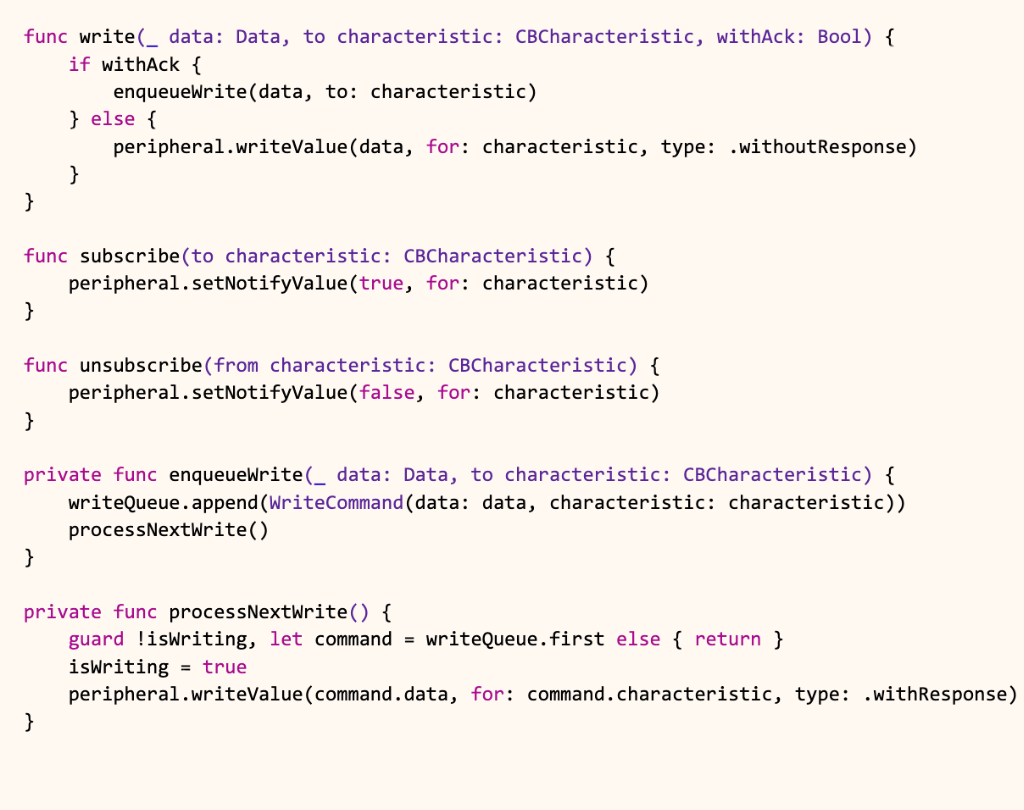
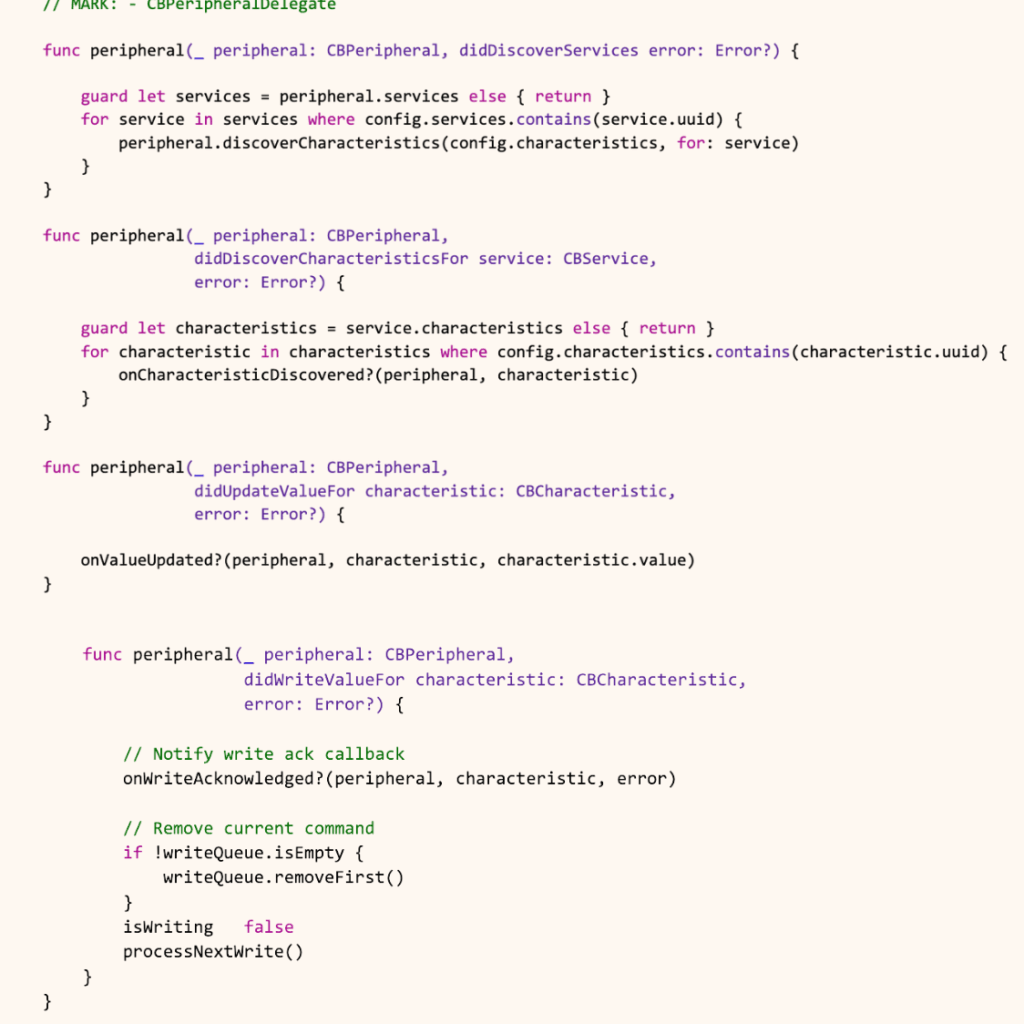
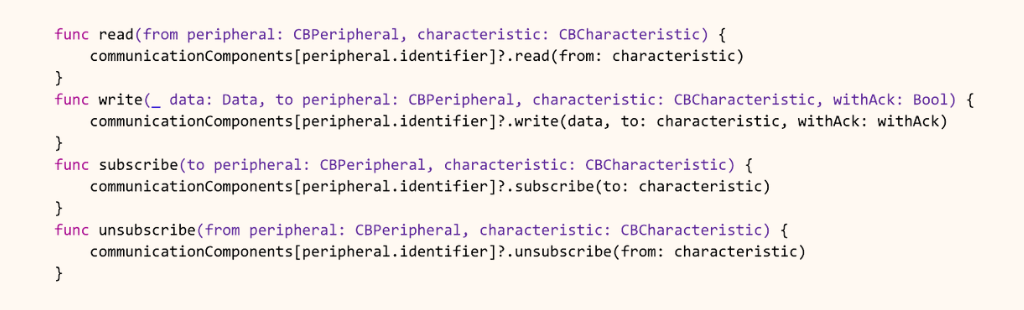
The CommunicationComponent is responsible for managing data-level interaction with a connected Bluetooth peripheral. Once a device is connected, this component takes over to discover services and characteristics, and to handle reading, writing, and subscribing to characteristic updates.
Its key responsibilities include:
● Discovering services and characteristics based on UUIDs defined in the CommunicationConfiguration.
● Reading values from characteristics.
● Writing data to characteristics, supporting both with-response (acknowledged) and without-response writes.
● Subscribing to notifications, enabling real-time updates when characteristic values change.
● Providing callbacks for when characteristics are discovered and when values are updated, allowing the application to react to peripheral interactions.
Now let’s dive into what communication with Bluetooth devices actually involves and the tools CoreBluetooth gives us to work with. The core actions we can perform on a peripheral are reading, writing, and subscribing to characteristic notifications. For simple, one-off operations, these are relatively straightforward.
However, things become more nuanced when dealing with write operations that require acknowledgment. In these cases, we need to wait for the peripheral to confirm the write (via the didWriteValueFor delegate callback) before sending the next command. This introduces the need for proper write sequencing to ensure reliable communication, especially when sending a series of dependent commands.
Let’s have a look at our configuration object for the communication component:
And now a proposed implementation for the component:
Let’s explore a bit now how we use our new component in the BLEDeviceManager and how it all comes together. This is our last piece of our puzzle that we tried to build in this article, so we can have a fully functional Bluetooth interface.
First of all, our BLEDeviceManager will hold reference to all the communication components because we are gonna instantiate one component for each peripheral we have connected. For easy access we will keep them into a dictionary with the UUID of peripheral as the key.

Then, where we successfully connected to the peripheral, we can create and store our communication component:
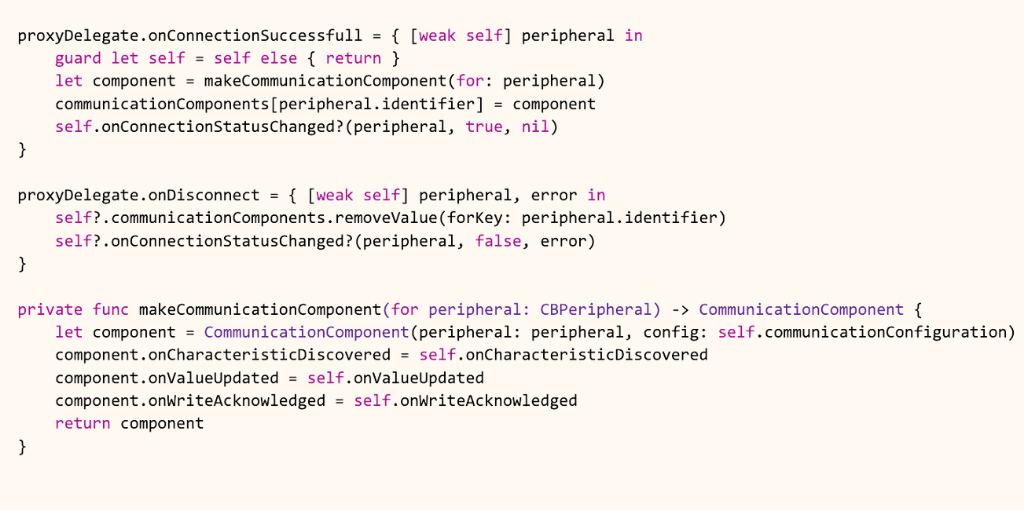
And then we implement the required methods from our IBLEDeviceCommunicationService:
Design Patterns Over Architecture
As we move deeper into the domain layer of our application, maintaining clean and scalable architecture becomes increasingly challenging, especially when new device types or manufacturers are continuously introduced.
When working with hardware integrations, it’s not uncommon to onboard a new device from a manufacturer that provides its own SDK, having custom discovery, connection, and communication flows already abstracted. While convenient, these SDKs often come with their own architectural assumptions that don't align with the structure of your app. Simply plugging them into your system risks introducing tightly coupled code, hidden dependencies, and inconsistent behavior across devices. This is where design patterns become essential — offering a way to standardize how external SDKs, or even your own lower level APIs are wrapped, adapted, and composed within your domain layer without compromising your architecture.
Why Design Patterns Matter for IoT Apps
● Bring structure & clarity to complex, multi-device environments.
● Separate concerns clearly using patterns like Mediator, Strategy, and Observer - ideal for organizing discovery, connection, and communication across device types.
● Make code extensible by decoupling device-specific logic with Factory or Dependency Injection.
● Enable scalability without rewriting logic for every new device.
● Improve collaboration through consistent, well-known architecture practices.
Behavioral Patterns in Action
Think of your domain layer as the heart of your application, it's where the real business logic lives. Now, imagine trying to add a new room to a house without disrupting the plumbing or electrical wiring. That's what it's like adding new features to a tightly coupled domain layer. Behavioral design patterns? They're like the blueprints that help you build that house with flexible wiring and modular plumbing. They give you ways to connect things and handle actions so that when you do need to add a new room (or a new feature), you're not tearing down walls. Instead, you're just plugging in a new module, keeping the rest of the house running smoothly. It's about making your code adaptable, so it can grow and change with your business without causing a major headache. In the next section we will explore two behavioural patterns that can help us achieve this.
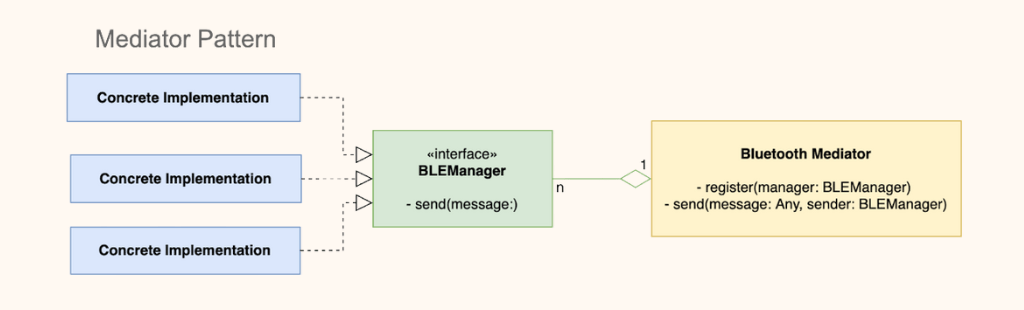
Imagine you're building a smart home system. You've got all sorts of gadgets: lights, thermostats, security cameras, and they all connect via Bluetooth. Now, each of these devices has its own little "brain," a Bluetooth Manager, that knows how to talk to it. But, if you want to make these devices work together, like turning on the lights when the security camera detects motion, things get messy. Each device's brain would need to know about all the other devices, and that's a recipe for chaos.
That's where the Mediator pattern comes in. Think of it as a central hub, a "smart home coordinator." Instead of each device's brain trying to talk to everyone else, they all talk to the coordinator. The coordinator knows who needs to hear what, and it routes the messages. So, when the security camera says "motion detected," it tells the mediator, and the mediator tells the lights to turn on.
This way, each device brain stays simple, focused on its own job. You can add new gadgets without messing up the existing ones, because they all just plug into the coordinator. And if you want to change how the devices interact, you change the coordinator's rules, not the individual device brains. It's like having a friendly, organized assistant that keeps everything running smoothly, making your smart home truly smart.
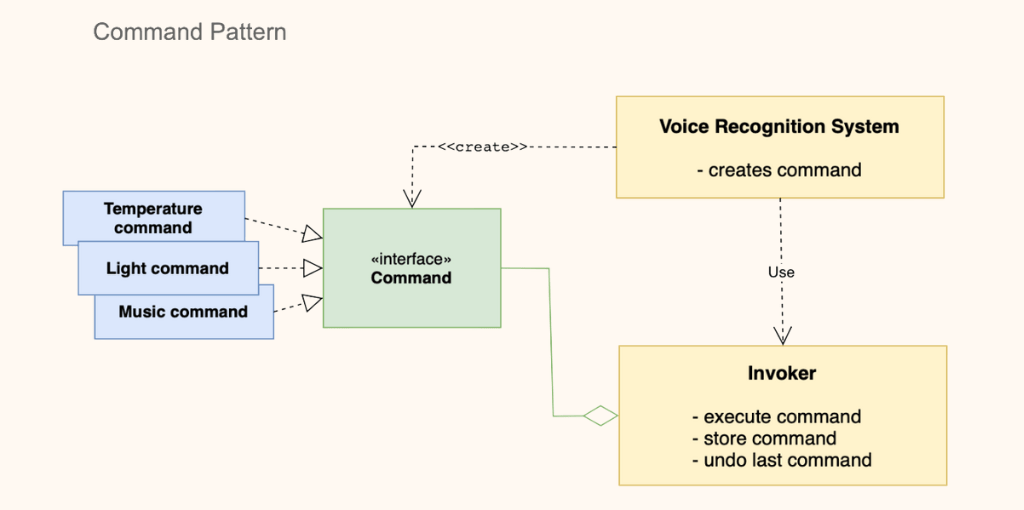
Let's imagine you're building a voice-controlled home automation system. You want to be able to say things like "turn on the lights," "set the thermostat to 72 degrees," or "play my favorite playlist." Now, you could have your voice recognition system directly call the functions to control each device. But what if you want to add features like "undo" or "macros" (a sequence of commands)? Things get complicated quickly.
That's where the Command pattern comes in. Think of it like this: instead of directly telling the devices what to do, you create "command objects." Each command object represents a specific action, like "turn on lights" or "set thermostat." These command objects know how to perform the action, but they're also separate from the actual devices.
So, when you say "turn on the lights," your voice system creates a "turn on lights" command object and hands it to an "invoker" (like a central controller). The invoker then executes the command.
The beauty of this is that the invoker doesn't need to know what the command does, just how to execute it. This makes your system super flexible. You can easily add new commands without changing the invoker. And because each command is an object, you can store them, queue them, undo them, or even combine them into macros.
It's like having a set of pre-written instructions that you can give to a universal remote. The remote doesn't need to know how the TV or stereo works, it just knows how to follow the instructions. This keeps your system organized, flexible, and easy to expand.
Conclusion
This article aimed to demonstrate the necessity of a context-sensitive, bespoke approach to iOS IoT app development, moving away from the strict imposition of standardized architectural patterns. It sought to highlight the importance of designing solutions that are uniquely adaptable to the specific challenges inherent in individual projects. This required a detailed examination of component-level design, emphasizing reusability and scalability from the initial stages, extending beyond the domain layer to encompass even the smallest service modules.
What we really wanted to get across is that building great IoT apps on iOS isn't a one-and-done deal. It's about a constant cycle of building, tweaking, and rebuilding. We wanted to highlight that the best approach is to continuously iterate on your solution, to keep refining it as you learn and as things change. This means paying attention to even the smallest bits of your code, making sure they're flexible and adaptable. Because, at the end of the day, it's that constant, thoughtful evolution that lets your app grow and stay strong, no matter what the future throws at it.
Designing scalable iOS apps in the ever-evolving IoT ecosystem requires both strategy and adaptability. If you're facing similar challenges or have your own approaches to managing complexity at scale, let’s continue the conversation. I’d love to hear how you’re navigating the chaos.